I’ve Got the Power (Steering)h

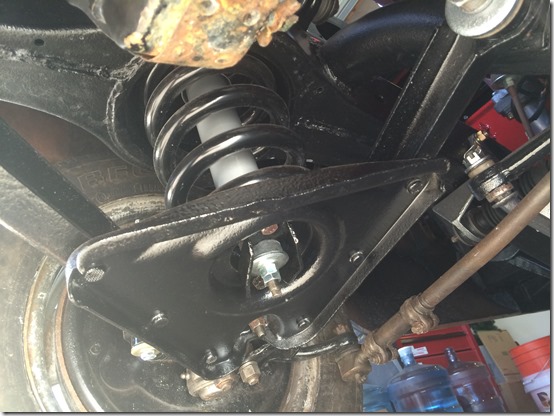
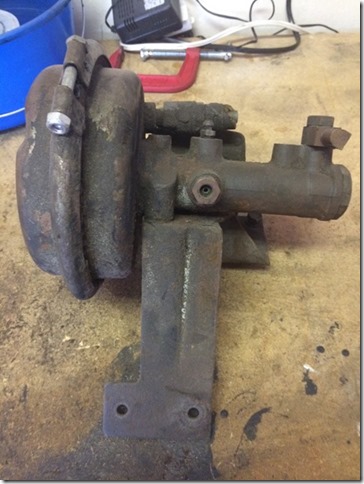
There was one last mechanical system that needed refurbishment on Grace and it was the Power Steering.  Based on the amount of greasy caked up crud on the power steering pump and control valve and the fact that rubber seals generally don’t last 60 years, it was time for a full rebuild of all components.

I had previously rebuilt the power ram cylinder but the rest of the system needed some attention.  I purchased a power steering pump rebuild kit from one of the Tbird parts suppliers and tore into it.  Basically I replaced every rubber component of the system which should give Grace a leak free power steering system.

First was removing the pulley and then I was able to gain access to the split ring retainer which holds the main shaft bearing. Behind this bearing is a rubber seal which was leaking pretty badly based on the caked up greasy residue.

IMG_1342I cleaned off some of the mess with a wire brush before removing the reservoir and the bolts that hold the two pieces of the pump together.

Once I had the two pieces broken apart with coercion from a small pry bar, I dug into removing the front bearing to gain access to the shaft seal.

IMG_1378With a plastic hammer I was able to drive the shaft out the front of the pump which took the front bearing with it.  I cleaned the shaft and bearing, installed a new seal after removing the old with a seal puller and was sure to lube the new seal to allow the shaft to be installed without ripping the new seal.

There are a handful of o-rings that also were replaced along with painting the components the original colors before reassembly.

IMG_1401With the pump rebuilt it was time to work on the control valve.  You can replace the control valve seals without removing the control valve from the the car.  First step is to remove the two screws that retain the dust cap.

IMG_1418The next step is to remove the retaining nut followed by the plastic washers, spring, spacer and retainer plate.  I placed all the components on a clean towel to keep the order correct.  Then I removed the control valve spool which is the part that needs the seals replaced.
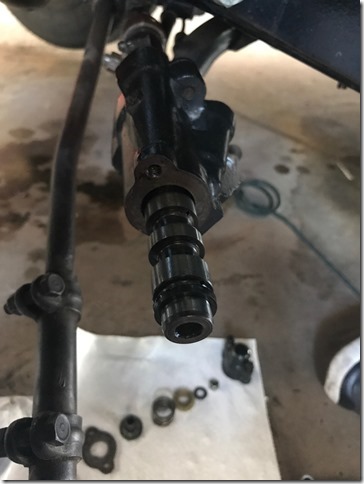
IMG_1420The seal furthest in the control valve will undoubtedly stay in the control valve housing so I used a pick to pull out the old rubber seal.

IMG_1423Good news is you can just install the new seals on the spool and use it to install the seal furthest in the control valve.  You’ll want to ensure the lip of the seals face inward, meaning the highest points are closest to the middle of the control valve spool.

IMG_1424I used some lube on these seals to ensure they weren’t damaged in the install.  After reinstalling the spool I put together the rest of the valve in the order I removed them.

The last step was to install the pump to the bracket already mounted to the water pump and to install the lines.  These went together pretty straightforward.  The bracket on the water pump has a threaded section where the slotted part of the pump bracket goes, then there is another hole that just has a bolt run through it and the pump bracket.
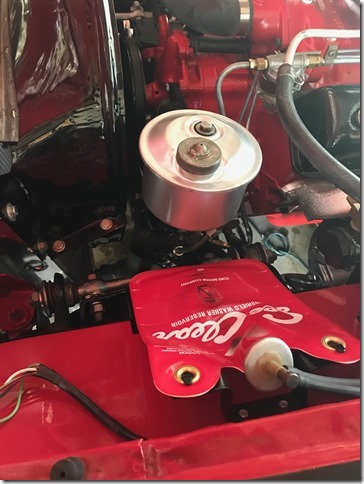
IMG_1425The last part was just installing the new rubber lines between the control valve and the power ram and pump.

IMG_1426The last step will be to install the v-belt and fill the system with ATF.  Once I get those two baby steps done I should have all the mechanical system completed on Grace!

Next steps (other than cruising SoCal top down) is to install the side windows and door panels. I had to order a few parts to complete the window and door panel install and hoping those arrive the end of the week so I can keep making progress next week.  Having a complete interior will certainly make Grace more comfortable to ride in!

Back in the Saddle

So now that Grace is roadworthy I have firsthand experienced that a Baby Bird is not designed for tall drivers.  Add in a manual transmission and the clutch and it makes it pretty difficult to maneuver safely.

I got an idea of building custom seat mounts from another Tbird buddy.  After riding in his car it was a lot more roomy and so I knew with a little ingenuity I could remedy some of the issue.  The approach I took was to fabricate new mounts and bolt them directly to the seat on one end and straight to the floor on the other.  Basically, I mounted the seat directly on the floorboards, as low as possible.

The first step was to draw out a plan using measurements from the original seat tracks. IMG_1310

After the fact I found that the holes in the floor were more like 40-3/4” but I determined a good fix for that later in the process.

IMG_1305

Ideally one would just measure the floor pan itself but the transmission tunnel is in the way.  My car had the manual seat which mounts in four places to the floor using threaded studs and flange nuts. The mounts themselves mount to the front of the seat with 5/16” bolts and to the rear of the seat with 5/16” fine thread nuts.  My new design would utilize all the original mounting positions as not to make any permanent modifications on Grace.

I started by using 2” wide steel and matched it to the contour of the floor using a vice and a BFH (aka large hammer). I then checked fitment to the floor before proceeding.

IMG_1306

IMG_1308

There is a little kick up in the mount where the front of the seat bolts to the floor that was replicated.  I then welded Grade 8 3/8” bolts to the mounts.

IMG_1309

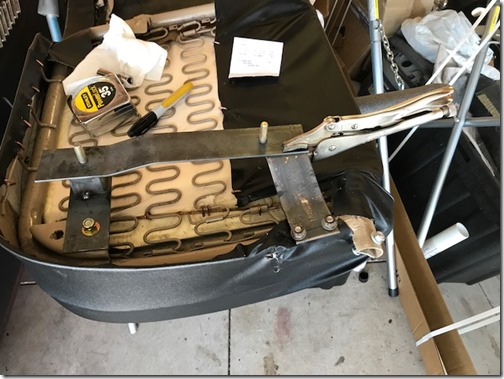
The front of the seat mount sits a little higher than the rear to support the legs and make the seat back comfortable.  Based on others experiences I ended making the risers 1-1/2” tall using 1-1/2” square tubing.  From there I welded another 2 inch section of steel to mount to the front of the seat.

IMG_1312

I copied the same design for the other side.  Then I moved on to making the rear mount sections, also out of 2 inch steel.  They too have a complex bend in them so I marked it with a Sharpie and went back to the vice and BFH to trial and error the bends until I was happy with it.  Then I drilled mounting holes and used vice grips to hold it all in place for welding.

IMG_1316

After tack welding I put it all together and installed the seat bottom in the car to ensure fitment and height.  I did need to slot the holes on one end to make it adjustable so I could get the seat to fit.

IMG_1321

IMG_1317

IMG_1318

I was happy with the results so removed it all and did the final welding.  Once welded up and cool, I then put on two coats of Rustoleum silver paint.

IMG_1324

IMG_1323

Last step was to install the seat back on the seat bottom and reinstall the assembly back in Grace.  The improvement is noticeable, however I was limited in the rearward placement of the seat do to the soft top.  Other folks have been able to move the seat an additional 1-1/2” back which would greatly improve comfort but I didn’t want to lose the ability to use my soft top.

I now sit in the car with my eyes below the header of the windshield and can actually see out of the car much better.  I still wasn’t too comfortable so I opted to get a 15” steering wheel in the same design as the original 17” wheel.

IMG_1361

Installation was somewhat straightforward but I was very cautious not to damage the original threads on the steering column.  I used a file to clean up the edges and used some anti-seize to help lube the new wheel in place.  Once I could get the steering column nut installed I slowly tightened it with a socket and ratchet.  These two projects together took a full weekend of time but made a huge improvement in the driveability of Grace.

Next project…rebuild the Power Steering pump and replace the control valve seals to get the Power Steering system up and running.  Stay tuned!

Grace Turns 60…Time for an Update

It has been a long time since my last update and that is largely because motivation stalled out after some repeated issues with the transmission and I’ve been busy with other priorities.

Katie and I have had a great last couple of years.  We are now in the best physical shape we’ve ever been with daily spin class or high-intensity interval training.  This has been a fun experience for both of us to find something we enjoy together.  Also, this year I got to check one item off the bucket list: attending the Pebble Beach Concours (known by the experts as just simply “Pebble”).  It was an amazing experience!

B4B00E28-F9CC-4891-AA17-5D61B64ACC64

While I was taking some time away from working on Grace she celebrated her 60th birthday in December.  To celebrate I decided it was time to get back to the project and have this be the year that I can say she’s finally finished.

When I left off last I finally had the opportunity to get Grace to come to life after longer than 40 years off the road.  The rebuilt engine is running quite well and I was even able to find an original rebuilt carburetor with the correct list number on the air horn.  With a rebuilt engine and transmission I was excited to hit the road.  Unfortunately after just about 2 miles the transmission was not staying in 2nd gear and then eventually started making a horrible sound.  After tearing it apart I found the bronze syncronizer rings were trashed. So, I replaced the rings and shoehorned the transmission back into Grace.  For those that have R&R’s a transmission in a 55-57 Tbird you know how this is an arduous process.  I ran into the same scenario again after about 5 miles so it has sat in the garage since as I just don’t have the energy to tear it apart again.

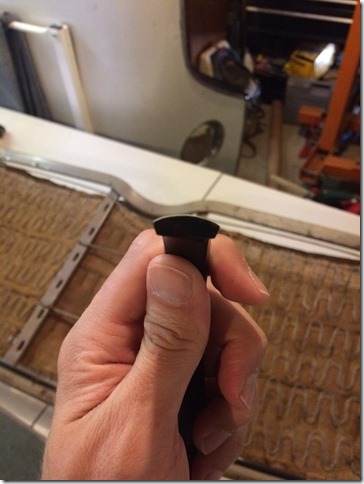
So, I decided to work on some other projects.  I reupholstered the original bench seat by tearing it all the way down to the springs, repainting the frame, installing new canvas, new foam, and finally new upholstery.  Tbird seats are much more complex than my previous experience with classic Mustangs.  Honestly, its worth every penny to take it to professional to redo the seat.  If you are a little crazy like me, here are a few photos of the process. The second photo is a replacement rubber strip I riveted onto the seat frame for the tacks to insert into.  The factory cardboard ones were not salvageable and the new pieces held really well.  I think it was only around $5 for 8 feet from an eBay seller.

IMG_0521F071E940-CAD6-4B57-A54D-218C94C933DF24B63BD5-F0CF-4C8F-ADB8-A0E52A0623A187168F30-5874-4E47-AB35-C7057A7A77A83924B148-A270-4C24-A9A7-60392F8C6E3F725814D3-FA52-4311-B067-BC3E9DA2319F

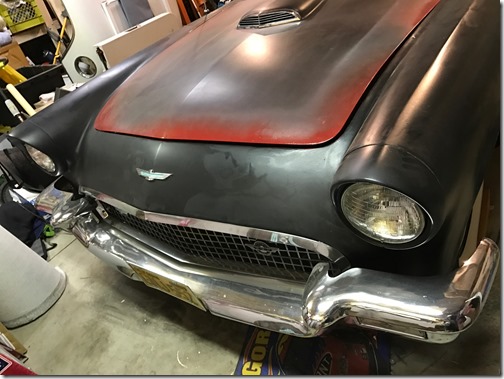
The other area that I found needed some help was the hood fitment.  Grace had been in an accident early in her life and the driver side hood hinge was bent causing the hood not to fit well.  I bit the bullet and sprung for a new (original used) one from Prestige Thunderbird.  A little Flame Red paint and it is ready for install.

IMG_0524

The hood catch mounts also needed to be painted so I did those at the same time and there were factory divots in the hood where they were “fitted” from the factory.  I reinstalled in the same place and will use these to help guide the fitment of the hood once I get the new hinge installed.  I chose not to paint the catches themselves since with one close they would lose all their paint. I think they still look nice and detailed.  Also, I was able to paint the backside of the hood and this was my first look at a large area of the Flame Red paint.  I got the single-stage urethane from TCP Global and the color is perfect and it lays really nice and is easy to spray.  I’m really pleased with the quality for the price.

IMG_0526IMG_0530

In the below photo you can see how the driver side hood hinge is bent back slightly.  Although it may seem like its not off by a lot, it is enough to make the hood sit about 3/4” too high and about 1/2” too far forward.  I’m praying the new hinge corrects this issue and I won’t have much work to fit the nose to the hood.FullSizeRender_2

IMG_0518Cruising without tunes was not an option so I installed a Retrosound radio in Grace that includes an AUX input so I can stream Spotify.  Also, the radio is AM/FM and the quality is very nice for the ~$200 cost.  I installed a factory antenna and a dual speaker in the original location which actually sounds quite nice, much better than the original. The kit comes with knobs that are reminiscent of a 65-66 Mustang but I found that the original discs and knobs from the Tbird radio fit without issue.  It doesn’t look like it doesn’t belong but has all the modern goodies…I’m a happy camper.

IMG_0523

Lastly, what’s a Baby Bird without wide whitewalls?  I really wanted to upgrade to radial tires so I opted with Coker Classic radials and for the 10 miles or so I’ve driven Grace they are quiet and ride 100 times better than old bias ply tires.  Since Grace is a C-Code base model ‘Bird (albeit one with Power Steering, Power Brakes, Radio, Backup Lights, Both Tops) I thought it would be fitting to go with the dog dish poverty hub caps.  I found a pretty nice set on eBay and still need to paint the centers but I believe I will do so with Flame Red in place of the factory white.  I stole the idea from my friend Rick Steiner and installed trim rings which add the right touch of class that a Tbird deserves but still gives me the look I want.

IMG_0527

I finally gave in and admitted I was at the point where I need help to get past this phase.  The transmission issue has sucked any motivation from me and I have time scheduled to bring Grace into Prestige Thunderbird in Santa Fe Springs to get the transmission sorted, the rear end seals replaced, and a front end alignment.  With these project complete, Grace will be roadworthy and I can enjoy her on the weekends as I finish up some final body prep and install the rest of the interior.  I’m excited to get moving on the Tbird project again and I anxious to get cruising down PCH top-down this summer!

The Dead Come to Life

It has been a long time coming, in fact I’ve waited for this moment since I acquired Grace in December 1999.  Grace is officially back to life…all this hard work is starting to pay off!

I finally finished up the small projects I needed to be ready to see if she would fire up.  First I had to put a few gallons of fuel in the gas tank and was happy to see when I turned the key to the ACC position that the fuel gauge works.  The sender and tank are brand new but you never know if the new parts are going to work so I was happy to see they did in this instance.  The only other small project was adding water to the radiator.  Between these two jobs I think I fixed half a dozen leaks!  The radiator hose isn’t on the pump far enough here, the fittings need to be tightened there…after remedying all the leaks I was ready for the first fire.

I thought I aligned the rotor to the #1 position when I installed the distributor so it should come to life quickly, that is if I had everything installed and hooked up properly.  A few pumps of the gas pedal and then I hit the ignition switch to engage the starter.  Good news…the starter works and cranks the engine well.  Bad news…the battery is almost dead from sitting for almost a year.

Next step was to get a battery charger to get the battery up to snuff so I could make another attempt at starting Grace from her slumber.  This was a good test in patience as I waited a day or so to ensure there was a full charge.  I hit the starter again and got her to cough a little.  This was a great sign…I have fuel, I have spark.  I kept trying to get her to light off to no avail.  Must be a timing problem I thought…I’ll fuss with it tomorrow.

The next night I spent only a few minutes fussing with the distributor and “boom, clack” she more than coughed…she fired right up.  The valves were not adjusted so the clatter sounded more light a cacophony than the symphony I had hoped for but she was running!  I picked up Katie from her girl’s night and took her straight into the garage where I got her to take this video.  (Link Below)

https://www.youtube.com/watch?v=KZXhY_-uqrQ

As you can tell from the video, the rockers are clattering and the alternator belt needs tightening.  Over the past few nights I’ve worked on remedying those issues and am hopeful she’ll be running like a top in a few weeks so I can take her for a spin around the neighborhood.

Excited about the mechanical progress I’ve made I was able to shift focus to the next big project on Grace, bodywork and paint.  I had primed the doors in epoxy primer like the rest of the body and then sprayed some white primer surfacer on them last week to prep the jambs for paint. 

Today I was finally ready to apply some more of Grace’s gorgeous Flame Red paint and they came out beautifully.

IMG_2008IMG_2009IMG_2010IMG_2011IMG_2012

Hopefully tomorrow night I can get the doors hung and she’ll start to look like a car again.  Also, if I find some spare time I need to bleed the brakes again now that everything is back together.  Grace is really starting to come together…I think I may even get to enjoy some seat time behind the wheel this summer!

Spring in my Step

The past two days have been hopefully a turnaround of motivation with getting the final steps of the restoration on Grace wrapped up.  The hood hinges came out amazingly and the more things I paint Flame Red the more I like the color!

With the hinges completely dry after 48 hours and the hood springs dry after sitting overnight I was able to get the springs installed back on the hinges and surprisingly they came together without a fight.  It seems like lately everything has been a challenge and it was nice to have something go as (un)expected. Smile

The springs are actually quite easy to install in the hinges.  You make sure the hooked end goes over the bar with the notched end and then simply spin the spring to “load” the tension and then use a plastic head mallet to drive the center of the spring home in the retainer.  Both sides were done in less than 5 minutes…success!

IMG_0117IMG_0118

I’m amazed how all these little details really make a dramatic difference in the restoration.  Grace is bay far the most challenging restoration I’ve taken on and the result of her needing everything refurbished is that she’ll end up one really nice car when II ‘m finished. 

I was able to carefully snake the hinges into place through the holes in the upper nose panel ensuring I didn’t chip the paint on the hinges or the nose panel.  I installed the bolts in place and made sure the hinges could fully articulate with no interference issues. 

IMG_1862IMG_1864

The only remaining piece before I can reinstall the radiator and shrouds is to get a helper to bolt up the hood to the hinges so I can ensure they are fitted correctly.  The faint light at the end of the tunnel is slowly getting a little larger and brighter…baby steps.

Lost and Found

So many of you that have been following my blog over the past 4 years have probably wondered what happened with Grace as I haven’t made a post in over 3 months.  Honestly, I have been trying to get back into the restoration but it seems like each time I take 1 step forward I end up 3 steps back.

The latest installment of this ongoing saga was the newly rebuilt radiator I purchased from the local radiator shop apparently wasn’t leak tested and had a rust hole in the bottom tank rendering it useless.  I found this out as I went to pour in the 5 gallons or so of distilled water.  Unfortunately this meant having to pull the radiator back out of the car, along with the shrouds which was somewhat of a pain.

I ended up just purchasing an aluminum aftermarket radiator for Grace in place of the original style copper unit.  It actually is quite nice and the tanks are polished which makes it the only shiny thing under the hood but I would much rather go for reliability at this point rather than authenticity.  Grace is supposed to be a turnkey car in which I will not hesitate to take her on a 1,000 mile trip on a whim, at least that is my hope.  I’m praying the new radiator contributes to making that dream a reality.

Why would I name this post Lost and Found?  I have had a fair amount of time to reflect since my father-in-law’s passing this summer and I think lost and found is evident in the past few months of work on Grace in the following ways.  The most obvious way is that I had trouble locating where I had placed the hood hinges.  I knew I had sandblasted them and put a nice coat of epoxy primer on them but had no idea where that “safe place” was.  I scoured the attic, entire garage shelving and cabinets no less than 3 times to no avail. 

Also, I feel a little lost in losing my “car buddy” that helped coach me along and gave me the motivation to finish up the car so he could take a ride in it.  Unfortunately that didn’t happen for me which has certainly made me feel a little “lost”.  I miss the times where he would read the manual cover to cover and share his insights to help with the build.  It was certainly helpful to have his knowledge when I was building the engine for Grace and if he were around when I was finishing the assembly I am sure I wouldn’t have installed the timing chain wrong which was another hassle altogether. 

Through these challenges I have found a likeness to our life apart from our Creator.  We are lost without a relationship with our Father, toiling in our day-to-day activities without a direction, void of a goal.  We truly are “lost”.  I don’t know about you all but feeling lost almost always results in loneliness and active or passive seclusion.  It is almost like it is our human-nature to be “lost”; dead to our original sin.  Thanks be to God that this isn’t the way he desires us to lead our lives.  Because of His overflowing and abounding love for us he sent His Son to pay the ultimate price to cure us from our “lost-ness” and bring us into a relationship with Him.  In the resurrection of Christ we are “found”, claimed and bought with the steep price of God’s own Son that we can escape the loneliness, the hurt, the pain, and to be in communion with Him.  This assured hope I have is the same hope that my father-in-law had and I am sure that he is in heaven watching down on me.

Back to the restoration of Grace…I finally found the hood hinges hidden in the spare tire tub of the trunk.  Indeed that was a very safe place, so safe in fact that I couldn’t even find it!  I wanted to get the hood hinges painted and installed before putting in the radiator so I wouldn’t have to remove the entire grille assembly to get the hood on the car.  With the hinges found I was able to give them a few coats of Flame Red paint and now they are almost ready for install.

IMG_1859IMG_1860

The only remaining piece was to reinstall the springs on the hinges but first they needed to be cleaned up with a wire brush followed by a coat of fresh black paint.

IMG_1861

After the springs dry I should be able to get the hinge assemblies put together and the hinges installed in the car.  Once those are in I can drop in the radiator, shrouds, and them fill the radiator and gas tank before that first start-up attempt.  I am hoping that will happen before the end of the year and that 2014 will be the year that Grace experiences her resurrection from her 43 year slumber.

Engine Primed and (Almost) Ready to Go

I was able to procure the appropriate sized socket and extension to prime the oil pump and oil system to get ready for the first fire of Grace’s fully rebuilt 292 Y-Block. I ended up getting pretty nice hand tools from a reputable tool supplier because I wanted one that had a separate lock on the extension to ensure the socket stayed on it! Last thing I needed at this point is to have a 1/4″ socket stuck in the engine block! With the socket slid down over the oil pump shaft I attached a 1/4″ to 3/8″ adapter and my speed wrench turning counter-clockwise to get the juices flowing.

IMG_0133.JPG

After turning it for a few minutes listening to the oil gurgle its way through the block I started to see some oil seeping from the rocker arms and the shaft overflow tubes. Success!

IMG_0135.JPG

IMG_0134.JPG

I buttoned everything back up and now only need to finish installing the fuel filler and filling the gas tank before I can see if she’ll fire. Its starting to get exciting!

IMG_0136.JPG

While cleaning up the garage a bit and tearing apart what was left of the seat for my ’53 Ranch Wagon (53ranchwagon.wordpress.com) I found a lucky penny from 1956. It was in incredible condition and I think it will find it’s way into Grace’s ash try.

IMG_0138.JPG

IMG_0137.JPG

I’m Back…Grace is Still Sleeping

This summer has been a significant season for change in my life which probably explains why I have almost completely stopped working on Grace, our ‘57 Tbird.  On July 13th my good friend, confidant, and father-in-law had his triumphant entry into heaven after fighting cancer for nearly 20 years.  Denny and I shared an interest in classic cars and I have many great memories working together on his 1950 Studebaker 2R5 Pickup and his help this past January was instrumental as I assembled the 292 Y-Block for Grace.  I was so excited at his last visit that on his next visit we could take Grace for a ride.  Although he physically won’t be able to take that ride with me in Grace, he certainly will be present in the impact he left on my life.  I’ve found it difficult to finish up the final little items left on the checklist to get Grace fired up and I think part of that is the grieving process preventing me from moving forward.  Most importantly, Denny had a faith that was inspiring at a minimum and I am excited to see him again when I get to share in the promise of salvation through the payment of Christ on the cross and his glorious resurrection as payment for each of our sins.

img_5745

I did get some little projects done on Grace this summer but I forgot to take pictures of some of them.  I removed the center section from the rear end after fighting to get the axles out of the housing and replaced all the seals.  It still leaks out the front pinion leather seal but it is much less than it did before.  I am hoping with some use the leather will swell and form a better seal.

IMG_1218

I filled the rear axle and transmission with 75W90 gear oil and the engine crankcase with some break in oil I received from one of my friends in my local Tbird club chapter.

The remaining work has been little jobs under the hood.  I had some trouble finding the correct length v-belt for the alternator conversion but I ended up with the Gates XL 9425 which is a little over an inch larger than the stock size with the generator.  Once I had the belt size correct I could install the water pump pulley, fan spacer, fan, and shroud.  It actually looks like a complete car now.

IMG_1278

I also installed the staples to hold the cork portion of the air cleaner to the base after getting powdercoated.  I needed to open up the size of the holes since the powder fills them in slightly and then was able to install new staples.

IMG_1279

I was planning on priming the engine by turning the oil pump to get pressure to the rockers before trying to start Grace up after her 43 year slumber.  It turned out that the 1/4” flex drive I purchased is too large for the hole in the engine block so I’ll have to hit up the tool store tomorrow and get the right size.

IMG_1277

One of Grace’s previous owners added a bunch of extra superfluous vacuum lines so I went to the local home supply store and got some 1/8” plugs to fill in the two holes in the carburetor spacer and the one in the valley cover.

IMG_1287

I also dug out from the drawer the silk screen labels that are supposed to go throughout the engine bay and interior.  I find some of these a little ironic because there was only one item that I added a label to that is actually factory correct for a ‘57 Tbird.  First I added the proper markings on the original case of the voltage regulator (which I gutted when converting to the GM 3-wire alternator).

IMG_1280

Next up on the non-original parts list was the markings on the ignition coil.  I added a Flame Thrower coil when I converted to the electronic ignition but it looks mostly stock with the exception of the top being black rather than yellow.

IMG_1283

And to round out the other non-original parts with original marking was the alternator.  I decided it would be somewhat funny to have the propoer generator markings on my alternator because it is a 100AMP vs. the stock 30AMP generator.

IMG_1281

The only original parts that received silk screens emblems was the glove box door and the starter motor.  I couldn’t get a good view of the starter but did refer back to some original photos of the glove box door to get the proper placement for the markings.  After I had transferred the tire pressure one on the glove box door I realized the Tbird parts house messed up and gave me one for a 55-56 Tbird because is states the stock size of the wheels is 15 inch.  Oh well, only I will know (well, I guess all you know now too).

IMG_1285

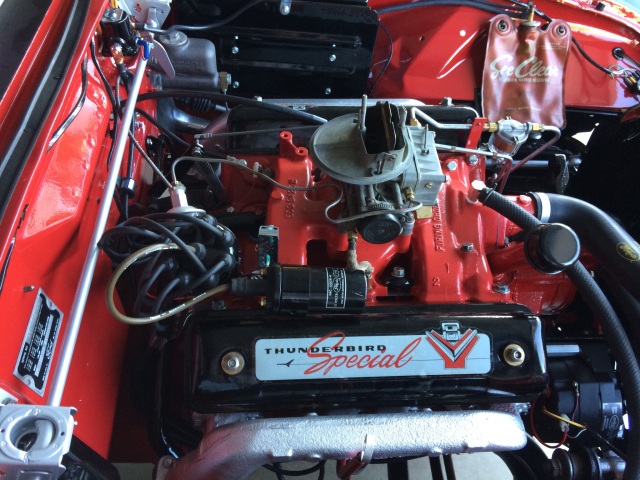
I needed to take a full shot of what the engine looks like as of tonight with the new markings.  Note, the distributor is pulled out in preparation for priming the engine and hoping Grace will come back to life.

IMG_1284

Lastly, I was discussing my license plate desire to find an original set of ‘56 California plates ideally with a ‘57 sticker to my friends in my Men’s Bible Study group.  It turns out that one of the guys had an original set of plates with the ‘57 sticker that he was willing to sell.  Apparently his dad had the plates from one of his old cars.  A call to the DMV to ensure they are clear for YOM rules and now Grace has period correct plates for when I am ready to register her.  That day seems to be coming quickly…

IMG_1288

Odds and Ends

Over the past week I got a lot done on Grace.  In fact I am only a few items away from having her road ready!  Below is a collection of small items I also got done but thought noteworthy enough for others that are restoring these cars.

  • Ignition Wires – Thankfully when I took apart the engine I kept all the wiring assemblies and brackets in place so I could easily track where to install the new ones.

IMG_0878

  • Throttle Linkage – I got back the throttle linkage from the powdercoater and it looks amazing.

IMG_0876

  • Backup Lights Switch & Shifter Arms– Grace is an oddball in that she came with the standard 3-speed transmission but with backup lights.  I had the switch and bracket but was missing the other bracket that attaches to the shifter arm.  I was able to get one from Prestige and the mechanical aspect of the backup lights is done.  I still need to wire it up and will connect it directly to the ignition switch so they light up even when the headlights aren’t on.

IMG_0890

  • Mechanical Heater Control Valve & Hoses – I opted to toss out the vacuum heat control system for two reasons; 1) I was missing the $100 vacuum control valve, and 2) a mechanical option will be more reliable.  I installed the valve under the heater core reducing box and it is almost invisible unless you are looking for it.

IMG_0907

IMG_0906

  • Front Shocks – I had installed the top part of the shocks but needed to R&R the mounts and I finally did that so I could wrap up the install.  It was more of a pain than I had hoped but a little help with a jack did the trick. (Note the yucky looking radiator, I’m going to take that out and paint it the correct gloss black)

IMG_0908

  • Brake Booster – I didn’t finish this project but I did want to dig in to see how many parts I would need to order.  My large diaphragm was in great shape so I can get away with the cheaper rebuild kit.  I also thought it was neat to see the original stamping in the booster and the inside was in extremely good shape.  The pressure valve still works great and the rubber parts are not showing any wear.  It should be a pretty simple rebuild.

 IMG_0901IMG_0902IMG_0903IMG_0904IMG_0905

Charging Ahead

When I started working on the restoration of Grace I wanted to keep her as original as possible.  I have a mildly customized ‘66 Mustang coupe and have found that when you change one thing it has a domino effect and next thing you know you have a totally modified car.  I didn’t want to do this with Grace but I have made a few improvements that I think will improve the roadability of Grace and since I plan on putting a lot of miles on this car certain things just make sense.  You may recall that I made some improvements to the handling after taking a ride in my friend’s ‘55 which include big sway bars in front and back along with Aerostar front springs and KYB Gas-A-Just shocks.

Another item I decided was better off being modernized was the charging system.  Not only is the big generator heavy and bulky but Grace was sporting a passenger car model that would have to be rebuilt and modified to fit the Tbird.  I put an internally regulated alternator in the Mustang and found it to be one of the better modifications I made to it so I did the same with Grace.  I opted for a GM style 3-wire that I picked up from a local hot rod shop in Orange that had been powdercoated in matte black.  It had a gaudy chrome fan and pulley on it but I figured I could always swap those out if I wanted for cheap.

I needed to head up to LA to see my friend’s at Prestige Thunderbird to get some parts and I knew they made a alternator retro-fit kit so I asked them about it.  The guys at Prestige really know their stuff, are true to keeping the cars original but also understand the driving demands of Southern California and that some improvements will greatly increase the enjoyment of these cars.  They showed me their kit and I found that since time to work on Grace is rare these days that I would purchase their kit and save myself some time engineering a solution.  I also opted for an electronic ignition and the guys took me around to 3 different cars in the shop that had the modification done so I could see where the wires should connect and come up with some ideas on how to attach everything without cutting up the brand new wiring harness.  I want to have all the modifications I made to Grace easily reversible.

IMG_0891

It was lunch time on my way home and so I thought I would stop by the newly opened Packing House in Anaheim which is a food court of gourmet food and craft beer housed in an old building that was formerly a packing house.  It was a little crowded there so I walked next door to a great burger place housed in an old Packard dealership.  The burger was amazing, the ambiance was fantastic and the lighting fixtures had me envious.  It turns out they found a collection of 1929 license plates underground when renovating the site and an artist turned them into some awesome lighting for the restaurant.

IMG_0882IMG_0883IMG_0884

Enough play, back to work on the Tbird…I started by installing the generator support bracket on the engine and fitting the retrofit spacer in the rear hole.  Then I used my impact gun to remove the chrome pulley from the alternator and installed the new machined pulley that aligns with the water pump and crankshaft pulleys.

IMG_0892

IMG_0895

I’m not a huge fan of the chrome fan but if I really hate it later I’ll swap it out for a black one or have by buddy powdercoat it.  With the new pulley installed I was ready to put the alternator in the car.  It sits between the spacer and the front area of the generator mount and looks almost like it was supposed to come this way.IMG_0896

The only remaining part was to install the slide mount that holds the alternator in place when the belts are installed.  That mount goes in the factory location and with it installed I could move towards making the electrical connections.

IMG_0897

The guys at Prestige said that I definitely need to disconnect the voltage regulator.  They said to cut all the connections so I could use the hubs for nothing more than making the wiring connections.  I took it once step further and completely gutted the regulator but drilling out he mounting rivets.  This leaves a nice empty box if I decide to add relays in the future for the headlights.

IMG_0893

I connected the wires as prescribed in the kit instructions and although the wire lengths are a little off, it looks almost completely stock under the hood.

As far as the hookup of the electronic ignition goes, I ended up purchasing a fuse tap with a male blade end to modify so I could mount the red and green wire to the positive terminal of the coil without cutting any wires.  I used my vice to flatten out the curve for the fuse tap end and then drilled a hole in it.  Lastly I placed it on the stud and tightened up the nut before connecting the wire.  You have to know that it isn’t stock to catch this modification also which makes me happy.

IMG_0870